> ## Documentation Index
> Fetch the complete documentation index at: https://docs.larafast.com/llms.txt
> Use this file to discover all available pages before exploring further.
# Stripe [updated]
> Stripe Integration in Larafast
### Connect Stripe to Project
1. Create a [Stripe Account](https://stripe.com/) and do the initial setup.
### Setup API Keys
To connect Stripe to the Larafast project you need to set API keys.
1. Copy Publishable and Secret Keys from [Developers->API Keys](https://dashboard.stripe.com/apikeys)
2. In your .env file replace the following keys
```dotenv .env theme={null}
STRIPE_KEY=publishable_key
STRIPE_SECRET=secret_key
```
### Subscriptions
To automate subscription creation from the project to Stripe, we have created a command that will create Stripe Products and Prices for you and save you all the hassle. No more manual subscriptions and price setups. (It also can be re-run in case anything changes, to sync the changes to Stripe)
1. In the project, open `/stubs/stripe/products.json`;
It contains example products. Modify the IDs and names of the products to meet your requirements.
2. Next, is Prices (Plans). Open `/stubs/stripe/prices.json`
In `prices.json` you will see the list of example prices. Change the data accordingly.
### Columns Explained
Price->ID - It's the name that you will use for checkout, basically it's stripe\_id for the price
Price->Amount - Stripe uses the lowest point for currency, for EUR and USD it's cents, and the amount should also be specified accordingly: `amount: 999` means the product price is **\$9.99**
Price->billing\_scheme - Can be `per_unit` or `tiered`
Price->Product - This should be the product->id from products.json for which the price will be created.
To learn more about available columns and settings, check [Stripe API Docs for Price Object](https://docs.stripe.com/api/prices/create)
#### Create Products and Prices
After you made your changes and added all your products and prices, run the following artisan command to push all the data to Stripe:
```bash theme={null}
php artisan stripe:create-products-and-prices
```
If you want to modify a product or plan, change them in .json files and rerun the command.
In the project `resources/js/Components/Plans.vue` update plan->slug with the ID of your price and that's it! :rocket:
### Subscription Checkout URL
```php web.php theme={null}
Route::get('subscription-checkout/{price}', [StripeController::class, 'subscriptionCheckout'])->name('subscription.checkout');
```
You are ready to accept payments and get subscriptions!
### Single Payment Products
If your project does not have subscriptions but has single-payment products, we've got you covered here too.
Check `/stubs/stripe/single_payment_products.json`
Do your changes and run:
```bash theme={null}
php artisan stripe:create-single-payment-products
```
For single payment prices stripe is not accepting "id", it is autogenerating. To accept single payments check your freshly generated prices in Stripe ( [https://dashboard.stripe.com/products](https://dashboard.stripe.com/products?active=true))->your product and use Price->API ID (e.g. price\_1OcPptFocfJlGF71c5uS2xjs )
### ProductCheckout URL
```php web.php theme={null}
Route::get('product-checkout/{price}', [StripeController::class, 'productCheckout'])->name('product.checkout');
```
### \[new] Products and Prices in Database
If you want to use products and prices from the database, you need to add following events to your webhook:
```bash theme={null}
product.created
product.updated
price.created
price.updated
```
To see the full list of required webhooks check [Webhooks](/features/payments/stripe#webhooks) section
After running `stripe:create-products-and-prices` or `stripe:create-single-payment-products` the products and prices will be created in the database via webhooks.
That means, that even if you create products and prices manually in the Stripe Dashboard, you will have them in the database and will be able to use them in the project.
To learn more about Products and Prices check `app/Listeners/StripeEventListener.php`
You can also sync products and prices from the Stripe Dashboard to the database by running:
```bash theme={null}
php artisan stripe:sync-products-and-prices
```
This command will sync all the products and prices from the Stripe Dashboard to the database.
***
### Stripe URL's
Larafast comes with stripe subscription and product checkout URLs, which you can find in **routes/web.php**
```php web.php theme={null}
Route::prefix('stripe')->name('stripe.')->group(function () {
Route::get('subscription-checkout/{price}', [StripeController::class, 'subscriptionCheckout'])->name('subscription.checkout');
// If your product checkout does not require auth user,
// move this part outside "auth:sanctum" middleware and change the logic inside method
Route::get('product-checkout/{price}', [StripeController::class, 'productCheckout'])->name('product.checkout');
Route::get('success', [StripeController::class, 'success'])->name('success');
Route::get('error', [StripeController::class, 'error'])->name('error');
Route::get('billing', [StripeController::class, 'billing'])->name('billing'); // Redirects to Customer Portal
});
```
### Middleware
Use pre-defined `Http/Middleware/Subscribed` middleware for subscription-protected routes.
```php web.php theme={null}
Route::middleware([Subscribed::class])->group(function () {
// Add endpoints that are only for subscribed users
});
```
## Customer Portal and Emails
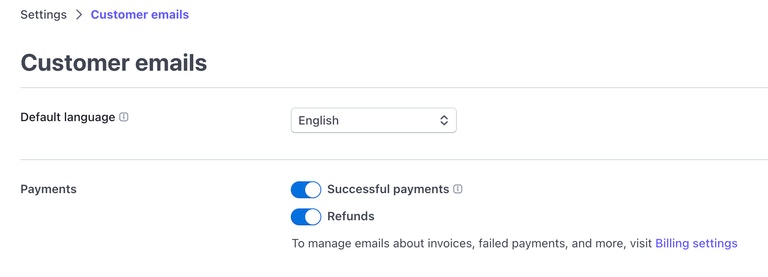
1. [Turn on Customer Emals](https://dashboard.stripe.com/settings/emails) for successful payments and refunds
 3. [Turn on the Customer Portal ](https://dashboard.stripe.com/settings/billing/portal)to allow users to manage their subscriptions, and payment methods and see invoices
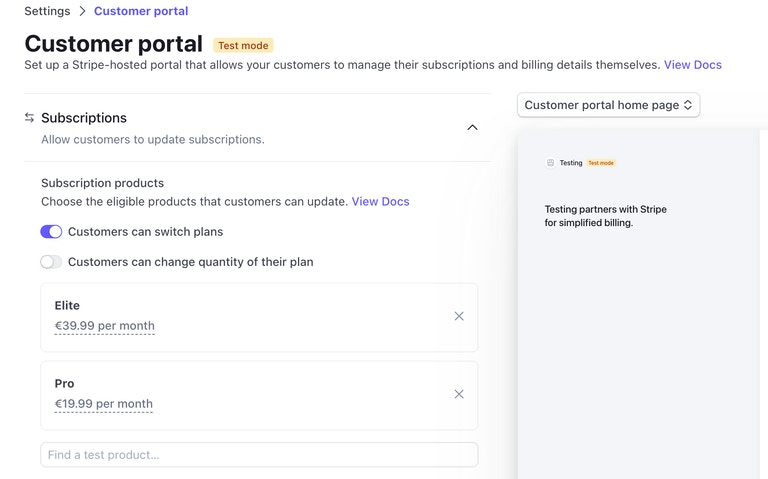
4. If you have subscriptions, make sure to allow users to switch plans and choose prices that are switchable
3. [Turn on the Customer Portal ](https://dashboard.stripe.com/settings/billing/portal)to allow users to manage their subscriptions, and payment methods and see invoices
4. If you have subscriptions, make sure to allow users to switch plans and choose prices that are switchable
 5. [Customize your Customer Portal ](https://dashboard.stripe.com/settings/branding)with your brand image and colors
To redirect users to their Customer Portal use /billing route
```bash web.php theme={null}
Route::get('billing', [StripeController::class, 'billing'])->name('billing'); // Redirects to Customer Portal
```
## Webhooks
Laravel Cashier automatically handles the following webhooks out of the box:
```bash theme={null}
customer.subscription.created
customer.subscription.updated
customer.subscription.deleted
customer.updated
customer.deleted
payment_method.automatically_updated
invoice.payment_action_required
invoice.payment_succeeded
// for products and prices to be created from the database
product.created
product.updated
price.created
price.updated
// for single payment products
checkout.session.completed
```
To create your webhooks, run:
```bash theme={null}
php artisan cashier:webhook
```
This command will use your APP\_URL to generate a webhook URL in Stripe. If you want to modify it, use:
```bash theme={null}
php artisan cashier:webhook --url "https://example.com/stripe/webhook"
```
If you need to add some credits to the user's profile or make some changes to his account after a certain webhook, you can do that in `app/Listeners/StripeEventListener.php`
For local testing, you can use [Stripe CLI](https://docs.stripe.com/stripe-cli)
```bash theme={null}
stripe listen --forward-to https://example.com/stripe/webhook
```
or
```bash theme={null}
stripe listen --forward-to http://127.0.0.1:8000/stripe/webhook
```
***
To learn more about Laravel Cashier check the [**official documentation**](https://laravel.com/docs/10.x/billing)
5. [Customize your Customer Portal ](https://dashboard.stripe.com/settings/branding)with your brand image and colors
To redirect users to their Customer Portal use /billing route
```bash web.php theme={null}
Route::get('billing', [StripeController::class, 'billing'])->name('billing'); // Redirects to Customer Portal
```
## Webhooks
Laravel Cashier automatically handles the following webhooks out of the box:
```bash theme={null}
customer.subscription.created
customer.subscription.updated
customer.subscription.deleted
customer.updated
customer.deleted
payment_method.automatically_updated
invoice.payment_action_required
invoice.payment_succeeded
// for products and prices to be created from the database
product.created
product.updated
price.created
price.updated
// for single payment products
checkout.session.completed
```
To create your webhooks, run:
```bash theme={null}
php artisan cashier:webhook
```
This command will use your APP\_URL to generate a webhook URL in Stripe. If you want to modify it, use:
```bash theme={null}
php artisan cashier:webhook --url "https://example.com/stripe/webhook"
```
If you need to add some credits to the user's profile or make some changes to his account after a certain webhook, you can do that in `app/Listeners/StripeEventListener.php`
For local testing, you can use [Stripe CLI](https://docs.stripe.com/stripe-cli)
```bash theme={null}
stripe listen --forward-to https://example.com/stripe/webhook
```
or
```bash theme={null}
stripe listen --forward-to http://127.0.0.1:8000/stripe/webhook
```
***
To learn more about Laravel Cashier check the [**official documentation**](https://laravel.com/docs/10.x/billing)